Introduction:
In the world of online advertising, tracking conversions is essential for measuring marketing success. Google Ads is a powerful platform, and with Google Tag Manager (GTM), you can accurately track conversions on your sales funnel. This blog post explores the significance of google Ads conversions, how GTM simplifies the setup, and provides a step-by-step guide to mastering Google Ads conversions using GTM on your sales funnel.
Why Google Ads Conversions Matter
Effective conversion tracking is vital for evaluating advertising campaign impact. Google Ads conversion tracking provides insights into marketing effectiveness, identifies areas for improvement, and drives data-driven decisions to optimize sales funnels. Discover the potential of Google Ads conversions and their transformative impact on advertising strategies.
Streamlining Conversion Tracking with GTM
Google Tag Manager (GTM) revolutionizes conversion tracking by managing multiple tracking codes, including Google Ads conversions. GTM consolidates tracking codes into a single container snippet, eliminating manual code implementation. Learn how GTM empowers marketers and website owners to effortlessly deploy and manage conversion tracking tags, streamlining the tracking setup, maintenance, and optimization of Google Ads campaigns.
Step-by-Step Guide: Setting Up Google Ads Conversions with GTM
Delve into the step-by-step process of setting up Google Ads conversions through GTM on your sales funnel. Follow our comprehensive guide to create a GTM container, configure conversion tracking tags, set up triggers, and ensure accurate implementation. Gain the expertise to leverage GTM’s full potential and gain valuable insights into your Google Ads conversions.
Getting Started: Implementing Google Ads Conversion Tracking through GTM on Click Funnels( Client-Side)
Step 1: Create a Google Tag Manager(GTM) Account
Note: You can skip this step if you already have a GTM account.
- Firstly, go to the GTM website and log in using your Google account details.
- Next, click on the “Create Account” button and give a unique name for your container.
Step 2: Set Up a New Container
- Afterward, select the ” Web ” container type and click the “Create” button to proceed.
Note: Each website or funnel requires a separate GTM container.

Step 3: Add the Container Code Snippet
- Then, copy the head and body code snippets from the tracking code pop-up provided by GTM.
- Next, go to your ClickFunnels account and navigate to the specific funnel or page where you want to add the GTM container.
- After that, click on “Settings” at the top right corner of the page.
- Scroll down to the “Tracking Code” section and paste the head code snippet into the “Head Tracking Code” field.
- Similarly, paste the body code snippet into the “Body Tracking Code” field.
Note: Each website or funnel requires a separate GTM container.

Step 4: Setting Up Lead Conversion Action in Google Ads
- Open Google Ads and access the account where you want to set up the conversion tracking for your funnel.
- Look for the “Tools & Settings” option located in the top right corner of the Google Ads interface. Click on it.
- Under the “Measurement” column, find and click on “Conversions.”
![]()
- On the “Conversions” page, click on the “+ New conversion action” button to create a new conversion action.
- Choose the conversion type as “Website.”
- You will be prompted to provide the URL of the website where you want to set up the conversion. Paste the URL in the provided field.
- Click on the “Scan” button to scan the website.
- Once the scanning is complete, click on “Add a conversion action manually.”
- You will be presented with various options for the setup. Select the “Lead Form” type.
- Enter a name for the conversion in the “Conversion name” box, such as “generate_lead,” that represents the specific action you want to track.
- In the “Value” box, check the option “Use the same value for each conversion.”
- After configuring these settings, click “Done.”
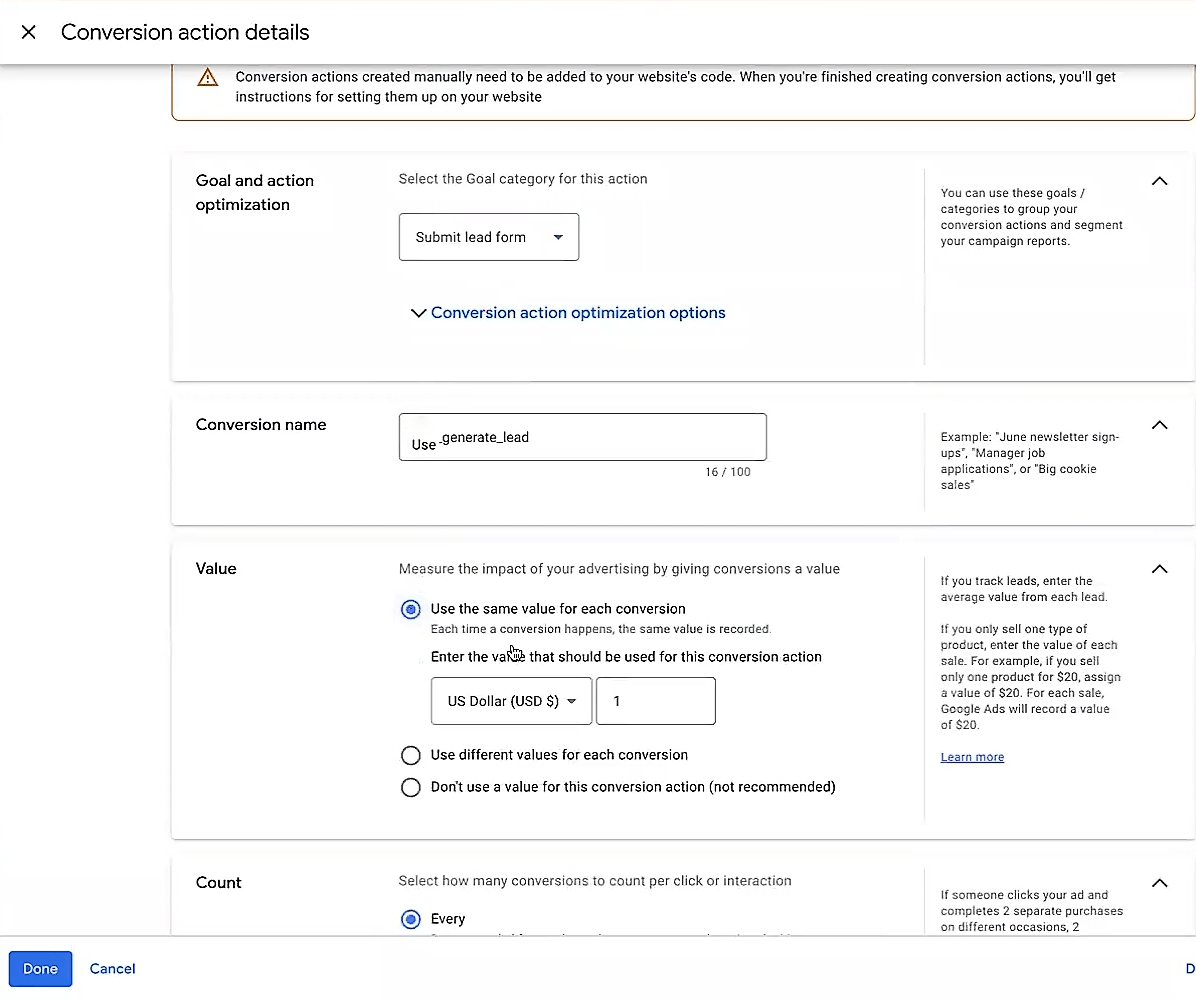
- Upon saving the configuration, you will be given options to set up tracking with Google Tag Manager. Click on that.
- You will see a Conversion ID
- Under the “Conversion name,” which you gave to the conversion e.g “Generate_Lead” you will find the conversion Label. Both the conversion ID and label are necessary for integrating conversion tracking with Google Tag Manager.
- Please note that the conversion ID and label are essential components when configuring the integration of conversion tracking with Google Tag Manager.
Step 5: Configuring Triggers for ClickFunnels Lead and Purchase Forms
To accurately track conversions on your ClickFunnels lead and purchase forms, it’s essential to configure triggers in Google Tag Manager (GTM). Follow these steps to set up triggers for both lead and purchase forms:
- Click on “Triggers” in the left menu to access the triggers configuration section.
- Click on the “New” button to create a new trigger. Give the trigger a descriptive name that corresponds to the specific form (e.g., “Lead Form Submission” or “Purchase Form Submit”).
- For the lead trigger, choose the trigger type “Form Submission.”
- Under the “Configure Trigger” section, select “Some Forms.”
- In the first box, change it to “Page URL,” and in the second box, select “Contains.”
- In the third box, enter the page path of the ClickFunnels step where the lead form is located.
- Click “Save” to create the Lead trigger.
- For the purchase trigger, follow the same steps as above, but this time, paste the page path of the ClickFunnels step where the purchase form is located into the third box.
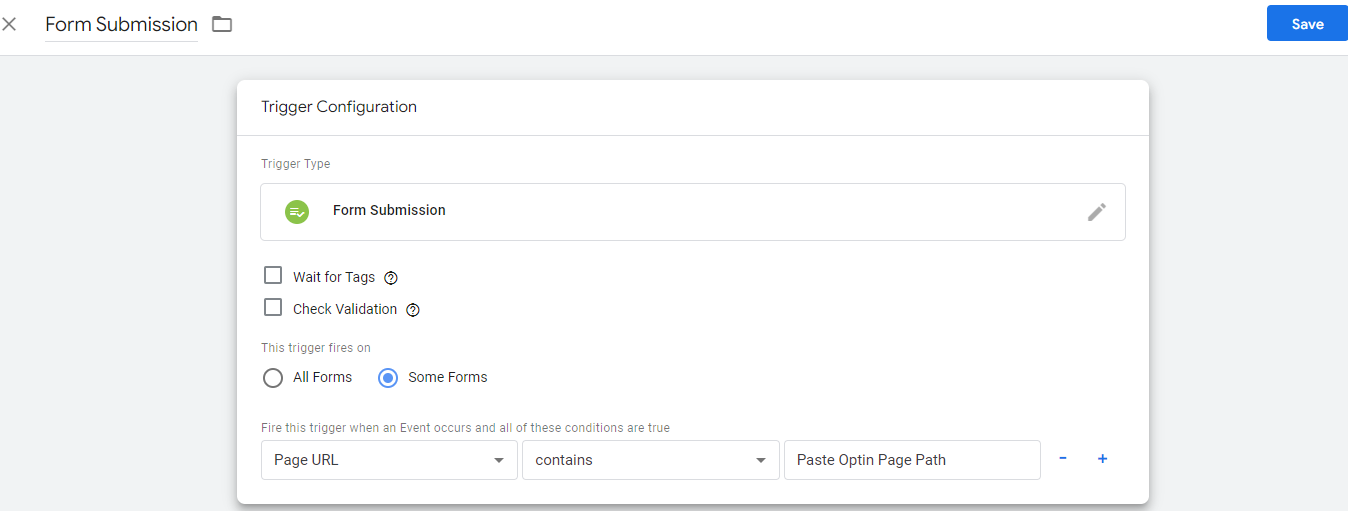
By configuring triggers for both lead and purchase forms, you ensure that the conversion tracking is activated when the specified events occur, enabling accurate measurement and optimization of your Google Ads campaigns.
Step 6: Configuring Lead Tag in Google Tag Manager
To track lead conversions in Google Ads, you need to create a lead tag in Google Tag Manager (GTM). Follow these steps to set up the lead tag:
- In GTM, click on “Tags” in the left menu, and then click on “New” to create a new tag.
- Choose the tag type as “Google Ads Conversion Tracking” provided by Google.
- After selecting the tag type, a warning about the conversion linker being missing may appear. Simply click “Create” and proceed.
![]()
- In the tag configuration, utilize the variables for the conversion ID and label you created In Step 4. Input these values into the respective designated fields.
- Scroll down to the configuration section, where you will find three checkboxes.
- Check the checkbox that says “Enable overriding settings in this tag.”
- Next, you will see a dropdown menu. Select the option “New Variable”.
- In the “Email” box, select the variable that corresponds to the email field.
- In the “Phone” box, select the variable that corresponds to the phone field.
- Once you have selected the appropriate variables, click “Save” to apply the changes.
- Save the tag configuration.
- Scroll down to the “Triggering” section and select the trigger type as “Lead Form.”
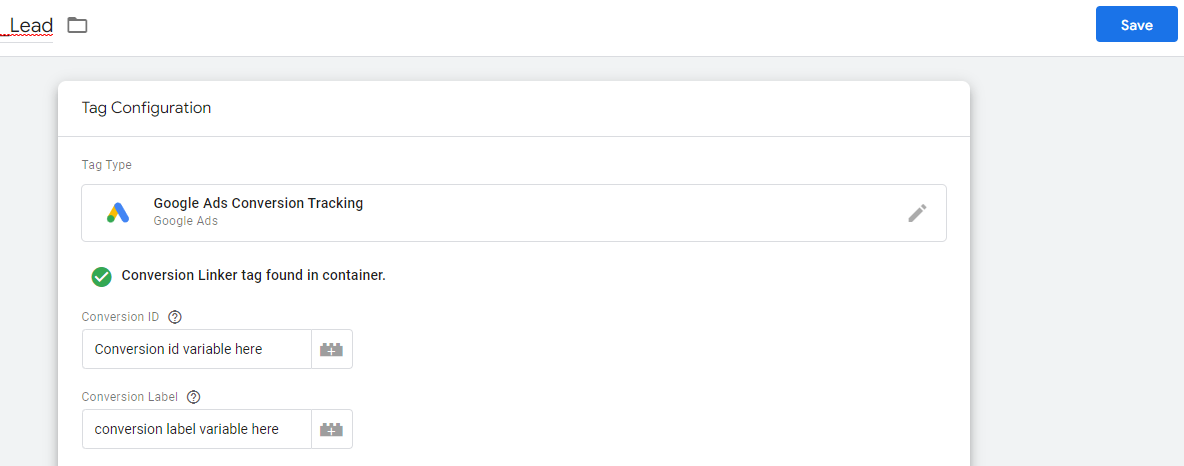
By creating the lead tag and associating it with the “Lead Form” trigger, you ensure that the tag is triggered whenever a lead form submission occurs in ClickFunnels. This allows Google Ads to track and attribute conversions accurately.
Step 7: Setting Up Purchase Conversion Action in Google Ads
To track purchase conversions in Google Ads, you need to create a purchase conversion action. Follow these steps:
- Repeat the same steps as in Step 4 to navigate to the conversion actions section in Google Ads.
- Click on the “+ New Conversion Action” button.
- Choose the conversion type “Purchase” to track purchase conversions.
- Provide a suitable name for the conversion, such as “Generate_Purchase.”
- Scroll down to the “Value” section and select the option “Use different values for each conversion.”
- Set a static conversion value for the purchase.
Click “Create and continue.”
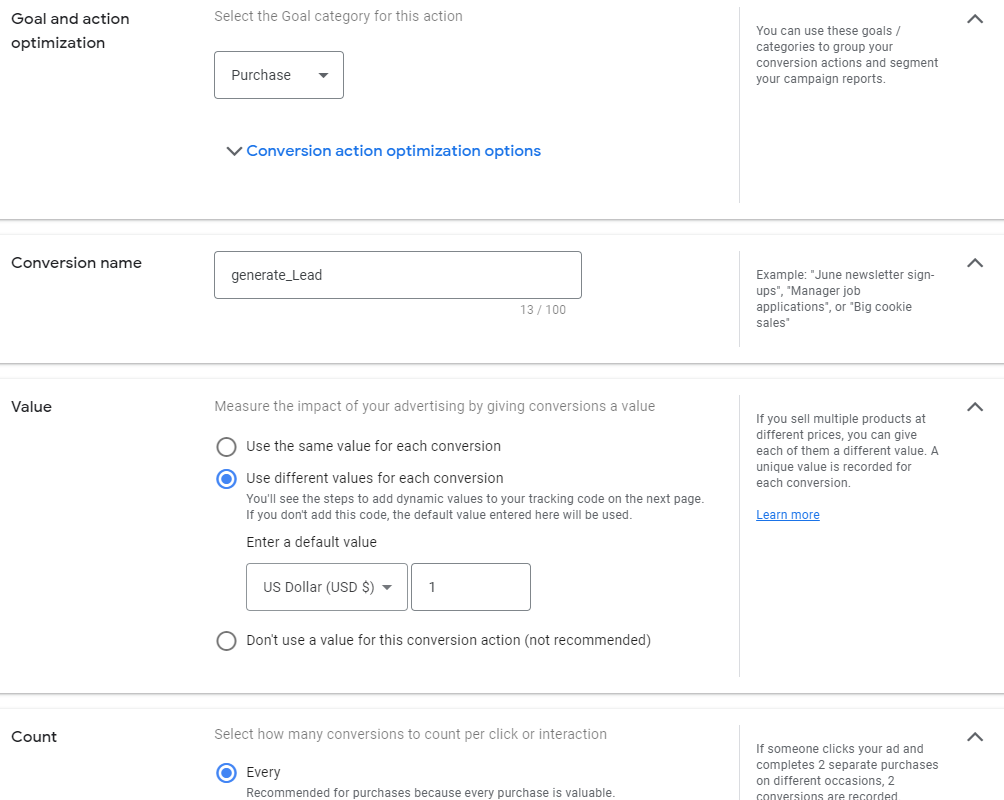

If you’re interested in setting up Dynamic value tracking for your conversions, our team is here to help. We specialize in implementing advanced tracking solutions, including dynamic value tracking in Google Ads and Google Tag Manager. Contact us today to discuss your specific needs and let us assist you in optimizing your conversion tracking. Reach out to us now to get started.
- After creating the conversion, you will have the option to set up tracking with Google Tag Manager (GTM).
- Click on that option. Make note of the conversion ID and label provided. These will be needed for setting up the purchase tag in GTM.
Once you have obtained the conversion ID and label, you can proceed to the next step to configure the purchase tag in Google Tag Manager.
Step 8: Configuring Purchase Tag in Google Tag Manager
To track purchase conversions using Google Tag Manager (GTM), follow these steps:
- In GTM, click on “Tags” in the left menu.
- Click on the “New” button to create a new tag.
- Choose the tag type “Google Ads Conversion Tracking” by Google.
- In the configuration section, use the variables for the Conversion ID and Label that you obtained from the previous Purchase Conversion step.
- Scroll down to the configuration section, where you will find three checkboxes.
- Check the checkbox that says “Enable overriding settings in this tag.”
- Next, you will see a dropdown menu. Select the option “New Variable”.
- In the “Email” box, select the variable that corresponds to the email field.
- In the “Phone” box, select the variable that corresponds to the phone field.
- Once you have selected the appropriate variables, click “Save” to apply the changes.
- Save the tag configuration.
- Scroll down and select the trigger type “Purchase Form” to associate the tag with purchase conversions.
- Click “Save” to create the purchase tag.
Supercharge Your Conversions with Dynamic Data: Unlock the Full Potential of Your Marketing Efforts!
If you want to send user-provided data dynamically from your site and unlock the full potential of personalized conversions, look no further! Our team specializes in setting up advanced tracking solutions that capture and utilize user data effectively. Contact us today to leverage the power of dynamic data and take your conversion tracking to the next level. Let us help you optimize your campaigns and deliver highly targeted and personalized experiences to your audience. Don’t miss out on this opportunity – Book a call with us now!
Step 9: Enabling Enhanced Conversions in Google Ads
To accept user data from your funnel and enable enhanced conversions in Google Ads, follow these steps:
- Go to Google Ads and navigate to the “Conversions” section.
- Select the lead conversion action that you previously set up. Scroll down to the bottom of the page and click on “Enhanced Conversions.”
- Check the box to enable enhanced conversions. Next, you will see an option for Google Tag Manager. Click on that option, and then click “Next.”
- Enter the URL of your website in the provided field. Click on “Check URL” to verify the URL. Once the URL is checked, click “Save” to apply the changes.
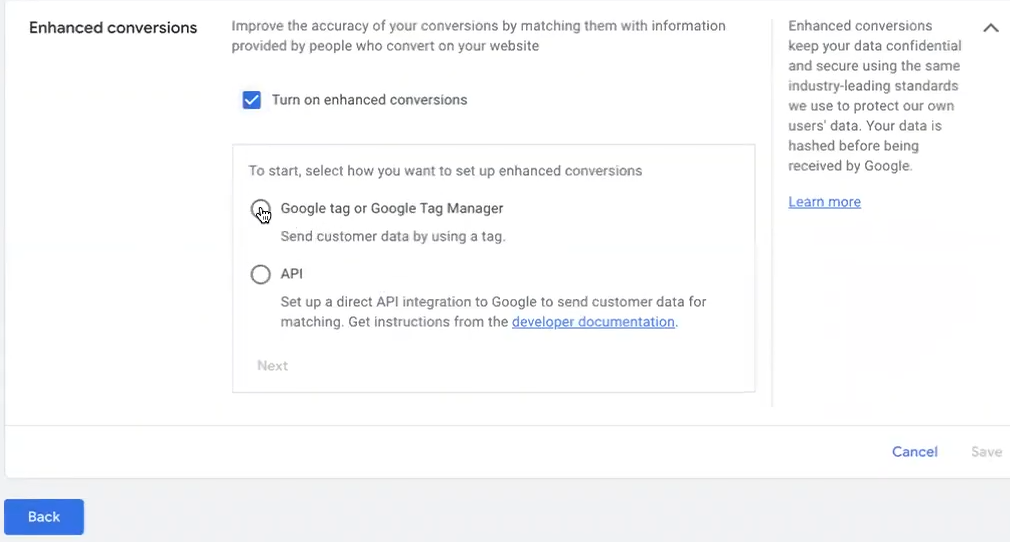
NOTE: Repeat the same steps for the Purchase Conversion action.
By enabling enhanced conversions, you allow Google Ads to receive and utilize the user data captured from your funnel, providing more accurate tracking and optimization capabilities for your advertising campaigns.
Setup Completed:
You have successfully set up Google Ads conversion tracking using Google Tag Manager for your ClickFunnels. By implementing this conversion tracking, you have unlocked valuable insights into the effectiveness of your marketing campaigns and can optimize your advertising strategy for better results.
With conversion tracking in place, you can now track and measure important actions such as lead form submissions and purchase conversions, enabling you to make data-driven decisions to improve your advertising performance.
Remember to regularly monitor your conversion data in Google Ads to gain valuable insights into the performance of your campaigns. Use this data to optimize your targeting, bidding, and messaging to drive better results and maximize your return on investment.
Conclusion:
In conclusion, harnessing the power of Google Ads conversion tracking using Google Tag Manager is a game-changer for your advertising efforts. Start optimizing your campaigns and unlocking their true potential today!
Take control of your conversions and drive better results by implementing accurate tracking. If you need assistance or want to explore advanced tracking solutions, our team is here to help. Contact us now to supercharge your conversion tracking and maximize your advertising success.
Don’t miss out on valuable insights and opportunities. Get in touch with us today and let’s elevate your online advertising strategy to new heights with our expertise in Google Ads conversion tracking.
